------------------------------------------------------------------------------------------------------------------------------
Step1. We have a customizing table with some fields.
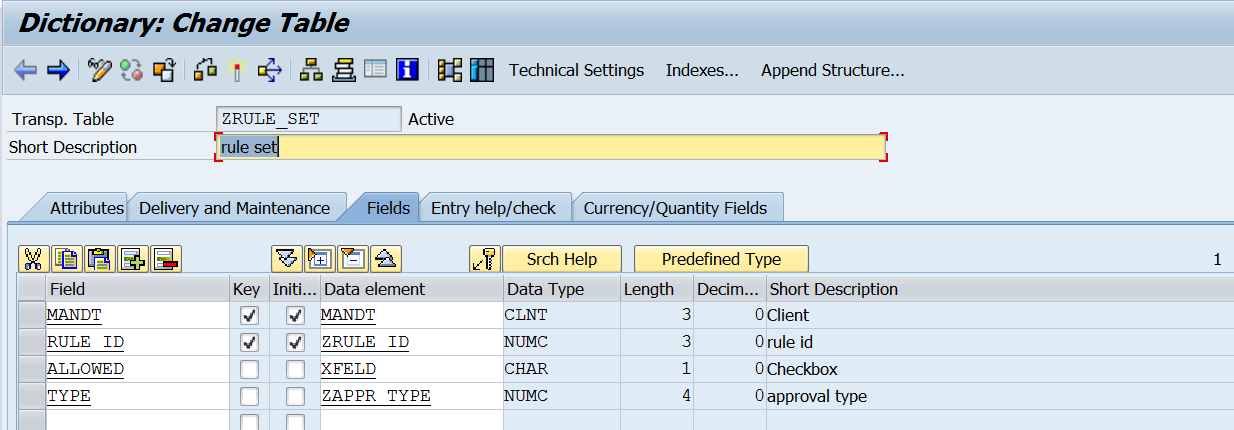
Step2. For the third field some domain fixed values.

Step3. Create a maintenance view.

Step4. Add all the fields and generate the TMG of the maintenance view.

Step5. So the TMG is created with two step type.

Step6. Now click on contents or go to Tx- SM30 and open the view to maintain.

Step7. Click on new entries.

Step8. So initially If you select or deselect the check box the approval type field is editable.
Now we have the requirement like when the check box is selected the approval type field should editable and when the checkbox is deselected then the approval field is non editable.

Step9.

Step10. Form the same screen , from system -> status.

Step11. Double click on the screen number - 2.

Step12. So here the flow logic automatically created when the TMG is generated. here we have to add our own logic for the above requirement.

Step13. Click on Layout.

Step14. Click on change mode. Double click on the check box, provide the text and function code. Activate and lastly click on Flow Logic button.

Step15. Now click on edit button. Add a new module in the PBO. Go on display mode.

Step16. Double click on the Module and from the pop up confirmation click YES to continue.

Step17. yes to continue.

Step18.Yes to continue.

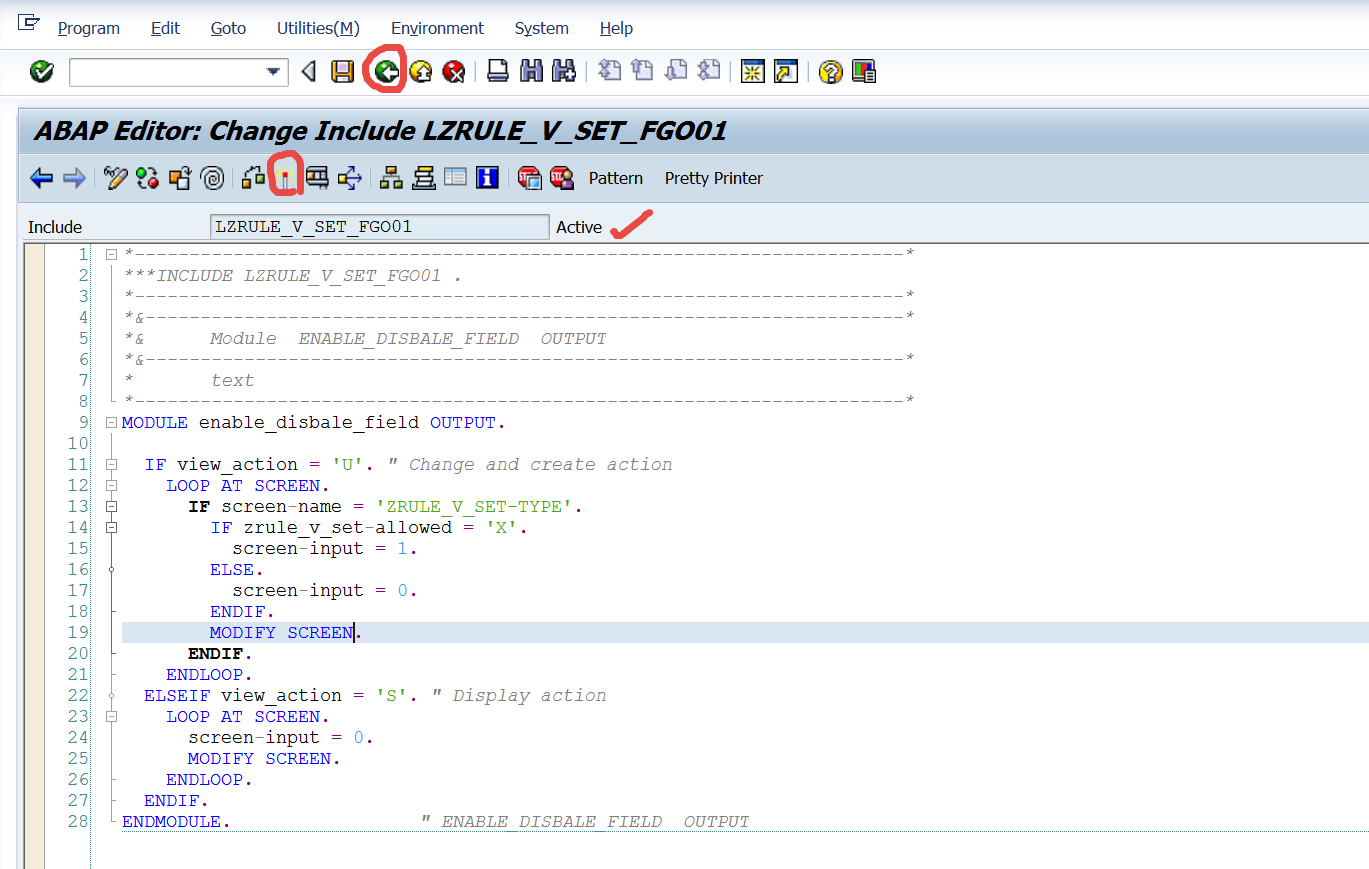
Step19. So here we arrived.

Step20. Put the below code.

Step21. Activate the module and go back.
Step22. From the Maintenance view TMG mark the Function group name.

Step23. Go to Tx- SE80 and open the function group. Double click on the function group name and its status is inactive.

Step24. Right click on the Function group name and activate it.

Step25. Again double click on the function group name and from the pop up choose Main Program.

Step26. Here the include program. In side that we have defined our Module .

Step27. So here it is.

Step28. No go to Tx- SM30 and open the maintenance view.

Step29. Click on New Entries.

Step30. So here we are. initially the allowed check box is not selected , so the approval type field is disabled.

Step31. Once selected, the approval type field is enabled.

------------------------------------------------------------------------------------------------------------------------------
Step1. We have a customizing table with some fields.
Step2. For the third field some domain fixed values.
Step3. Create a maintenance view.
Step4. Add all the fields and generate the TMG of the maintenance view.
Step5. So the TMG is created with two step type.
Step6. Now click on contents or go to Tx- SM30 and open the view to maintain.
Step7. Click on new entries.
Step8. So initially If you select or deselect the check box the approval type field is editable.
Now we have the requirement like when the check box is selected the approval type field should editable and when the checkbox is deselected then the approval field is non editable.
Step9.
Step10. Form the same screen , from system -> status.
Step11. Double click on the screen number - 2.
Step12. So here the flow logic automatically created when the TMG is generated. here we have to add our own logic for the above requirement.
Step13. Click on Layout.
Step14. Click on change mode. Double click on the check box, provide the text and function code. Activate and lastly click on Flow Logic button.
Step15. Now click on edit button. Add a new module in the PBO. Go on display mode.
Step16. Double click on the Module and from the pop up confirmation click YES to continue.
Step17. yes to continue.
Step18.Yes to continue.
Step19. So here we arrived.
Step20. Put the below code.
Step21. Activate the module and go back.
Step22. From the Maintenance view TMG mark the Function group name.
Step23. Go to Tx- SE80 and open the function group. Double click on the function group name and its status is inactive.
Step24. Right click on the Function group name and activate it.
Step25. Again double click on the function group name and from the pop up choose Main Program.
Step26. Here the include program. In side that we have defined our Module .
Step27. So here it is.
Step28. No go to Tx- SM30 and open the maintenance view.
Step29. Click on New Entries.
Step30. So here we are. initially the allowed check box is not selected , so the approval type field is disabled.
Step31. Once selected, the approval type field is enabled.
------------------------------------------------------------------------------------------------------------------------------
No comments:
Post a Comment