Scenario: Configuring SAP system so that we can post customer Invoice in SAP FI. This post describes initial sap system configuration, creation of GL accounts, Customer master and creating customer invoice and creating customer incoming payment.
Step0. Go to Transaction SPRO and click on SAP Reference Object.

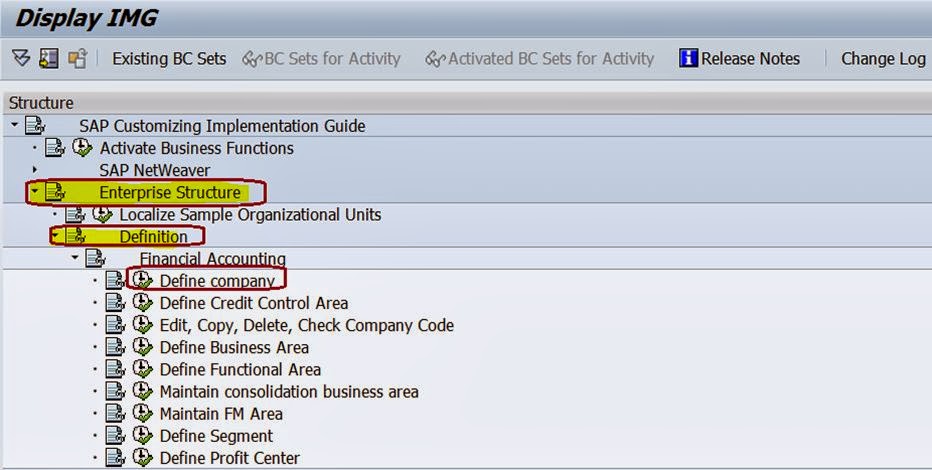
Step1. Navigate along the highlighted path to create Company.
Step2. Click on New Entries.
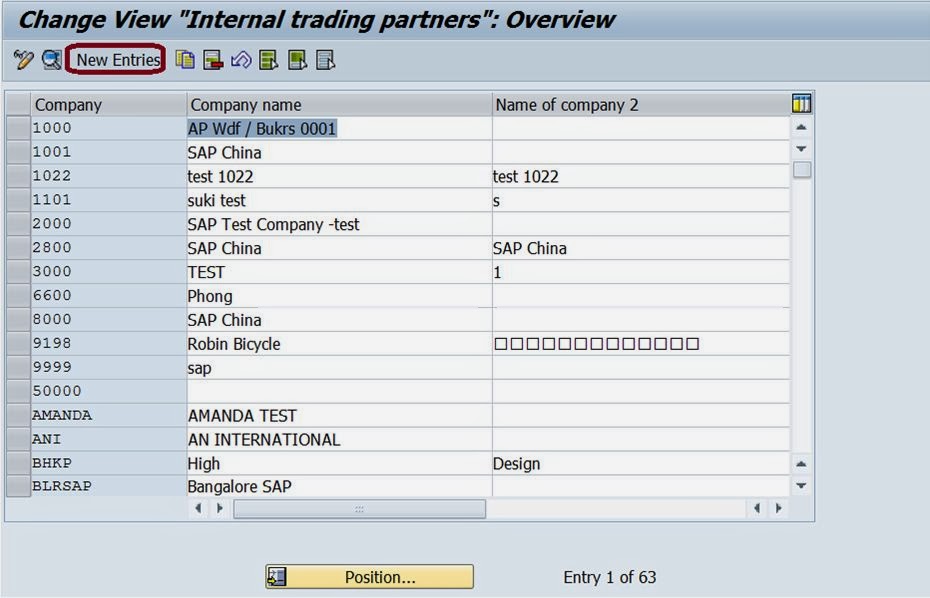
Step3. Provide the details and save it. So the Company ABC is created.

Step4. Navigate along the highlighted path to create company code.

Step5. Click on Edit company code data.

Step6. Click on New Entries.

Step7. Provide company code details and click on save button

Step8. Provide additional details and click on Continue button

Step9. Company code AB99 is created. Save it and go back.

Step10. Navigate along the highlighted path to assign company code to company.

Step11. Find your company code entry.

Step12. Provide Company name for the company code and save it and go back

Step13. Navigate along the highlighted path to create fiscal year variant.

Step14. Click on New Entries.

Step15. Provide fiscal year variant name, number of posting period and no of special period and Save it. Select the Fiscal year variant and click on Periods options from left hand side.

Step16. Click on New Entries.

Step17. Provide the 12 period details and save it.

Step18. Go Back.

Step19. The variant with 12 posting periods are defined. Now Go Back.

Step20. We reached the initial screen. Now Go Back.

Step21. Navigate along the highlighted path.

Step22. Here we can find the line to assign the above created fiscal year variant to the Company code.

Step23. Assign the fiscal year variant to company code. Save it and go back.

Step24. Navigate along the highlighted path to create variants for open posting period.

Step25. Click on New Entries button.

Step26. Provide a 4 character variant name and description and save it. Go Back.

Step27. Navigate along the highlighted path to create open and close posting period.

Step28. Click on New Entries button.

Step29. Provide the below details. Save it and go Back.

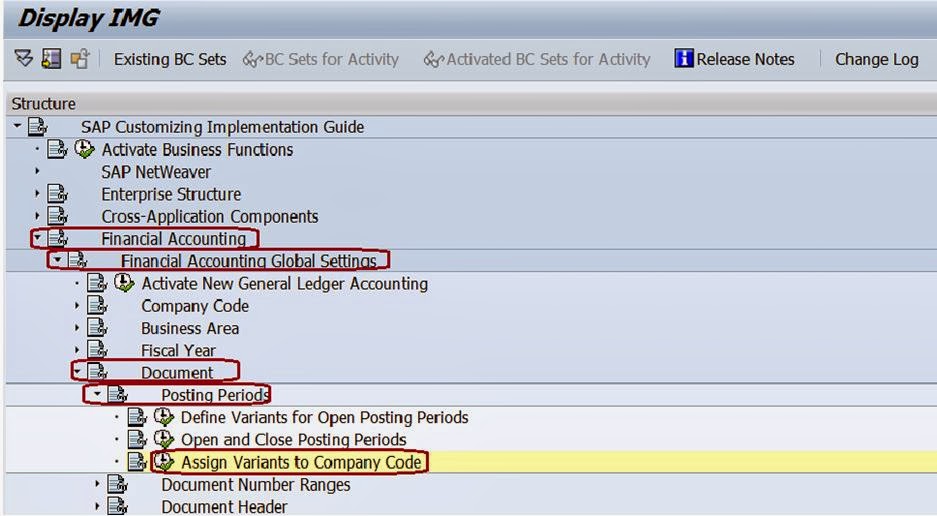
Step30. Navigate along the highlighted path to assign Variant to company code.
Step31. The below line appears for the company code.

Step32. Assign the posting period variant to the company code. Save it & go back.

Step33. Navigate along the highlighted path to create our own document type or to see the details of teh standard document type provided by SAP.

Step34. The standard document type DR is provided for customer invoice. Double click on it to see the details.

Step35. We shall be using this document type DR to create customer invoice for our company code. To maintain number range for this document type click on the Number Range information button. Mark that we shall use number range '18'.

Step36. Here it asks for the company code name for which number range to be maintained for the document type DR.

Step37. Provide the company code and and click on the change button.

Step38. Click on the '+' button.

Step39. Provide number range '18', from number and To Number. Mention year as 9999 so that this number range can be used for our company code foe every year. If you want to maintain number range for a specific year then provide that year under the YEAR column. save it and go back to the main screen.

Step40. Standard Document type 'DZ' is provided to create document for the customer payment. Select the Document type DZ and click on the Details button.

Step41. To maintain the number range click on the Number Range Information Button.

Step42. The below screen appears.

Step43. Maintain our above created company code name and click on the Change button.

Step44. Click on the + button.

Step45. Maintain the below details like from and to number for the document type DZ. Save it and go back.

Step46. Navigate along the highlighted path to create tolerance group for the user.

Step47. Click on the New Entries Button.

Step48. Maintain the details and save it. Go Back.

Step49. Navigate along the highlighted path to assign the tolerance group to the user

Step50. Click on New Entries.

Step51.Provide the user name( 'sap logon user name') and the above created tolerance group. Save it and go Back.

Step52. Navigate along the highlighted path to create tolerance for customer.

Step53. Click on new entries button.

Step54. provide the below details. Save it and Go back.

Step55. Navigate along the highlighted path to create chart of account.

Step56. Click on New Entries button.

Step57. provide the chart of account name, G/L account length and save it.

Step58. Navigate along the highlighted path to assign the Chart of account to Company Code.

Step59. Go to our company code line.

Step60. provide the chart of account to the company code. Save it and go back.

Step61. Navigate along the highlighted path to create account group.

Step62. Click on New Entries.

Step63. Create three groups like customer, material and cash with from and to account range.
Here we just declared three groups as we will create customer invoice so that customer and material group are involved. When the customer makes the payment custometr and cash account are involved.

Step64. Navigate along the highlighted path to create Retained Earnings account.

Step65. Provide the above created chart of account number and click on the continue button.

Step66. provide below details and save it. Go back.

Step67. Navigate along the highlighted path to create field status variant.

Step68. Select the standard variant '0001' and click on the field status group.

Step69. Below Field Status Group are present in stanrdard. We shall be using these for our case.

Step70. Navigate along the highlighted path to assign the company code to the field status variant.

Step71. Go to our company code line.

Step72. Provide the details. Save it and Go Back.

Step73. Navigate along the highlighted path see the company code global parameters are maintained properly or not.

Step74. Select our company code and click on Details button.

Step75. Here you can find all the company code parameters assigned in different steps to the company code .

Step76. Now go to Tcode- FS00 to crate G/L account.

Step77. Click on the create button.
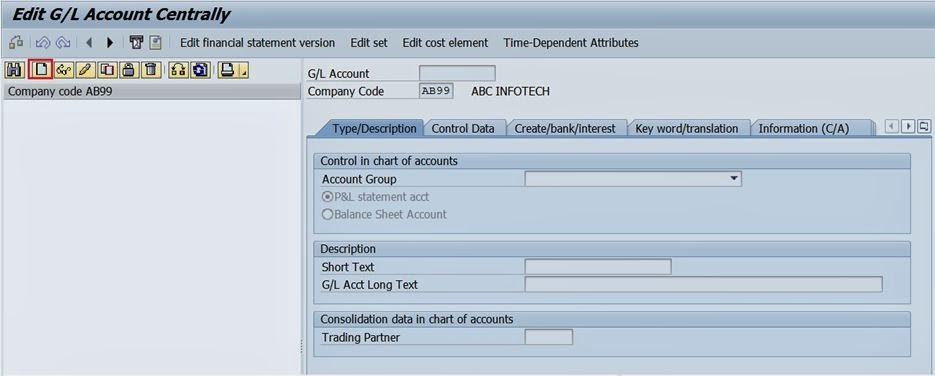
Step78.

In above we have created three groups each with different number range. Lets create Cash Account first. Provide a G/L account number, company code and click on continue button.

Step79. Provide the details and click on Control Tab.

Step80. Provide the details and click on the Create Bank/interest tab.

Step81. Select a field status group and save the CASH G/L account.

Step82. Again click on the Create button.

Step83. This time we shall be creating a material account.
Provide a material account number from the number range, provide company code and click on continue button.

Step84. provide the details. lastly click on Control Data tab.

Step85. Provide the details and click on the highlighted tab.

Step86. provide the field status group and save it.

Step87. Again click on create button to create a customer reconciliation account.

Step88. Provide the G/L account number, company code and click on the continue button.

Step89. provide the below details and click on Control Data tab.

Step90. Provide the below details and click on the next tab.

Step91. Provide the field status group and save it. Now the needed three accounts for our case are created.

Step92. Go to Tcode- XD01 to create a customer.

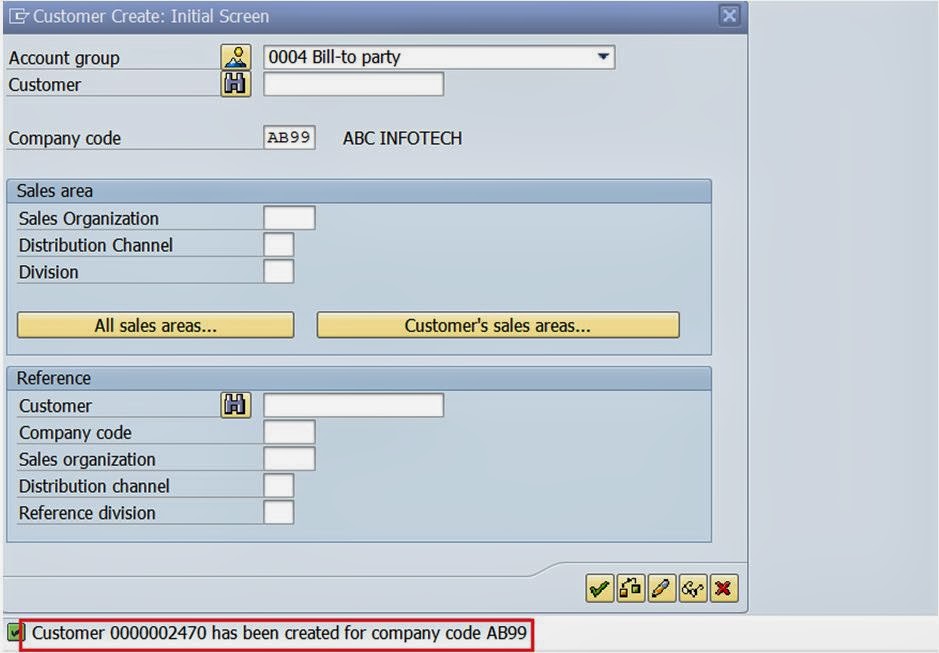
Step93. Select below details and click on the continue button

Step94. provide the details and then click on he company code Data button.

Step95. here we need to maintain the Reconciliation account for the customer. press F4 button.

Step96. Select the reconciliation account and continue.
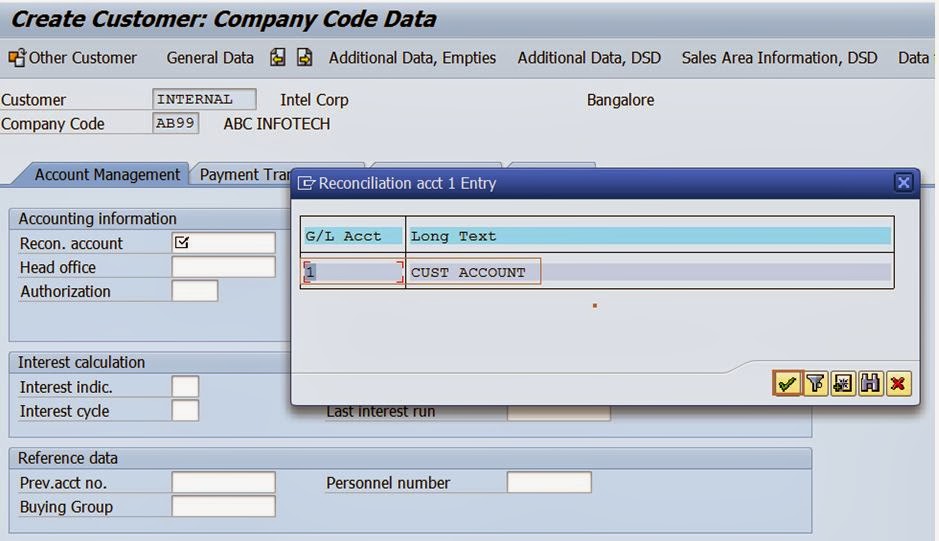
Step97. Save the customer.

Step98. The below customer is crated.
Step99. To create customer invoice go to transaction : F-22.

Step100. The document type is DR , provide the company code

Step101. provide document date. As per the three golden rules of accounting, the customer is receiving the material so customer account is debited. So chose the posting key as 01 and the account is the customer name and hit the Enter key from keyboard.

Step102. Provide amount as 1000. The material account is credited. So choose posting key as 50 and provide the material account and hit the Enter key from keyboard.

Step103.

Step104. Povide material amount as 1000 and click on the document menu.

Step105. Click on simulate option

Step106. Here you can find two lines. Customer is debited and material G/L account is credited. At lats click on Save button.

Step107. Customer invoice type DR is created with document number: 1.

Step108. Go to tcode- FBL5N to see customer open and cleared items

Step109. Provide the customer number and the company code, choose Open Items radio button and execute it.

Step110. You can find the customer open items with the red traffic light.

Step111. Now the customer comes and make the payment. So in the sap system it should be captured. To clear the open items. So go to transaction F-28.

Step112. You can see the Document type is - DZ . Customer Incoming Payment.

Step113. Provide the document date, cash account -20000, amount-1000.
Customer number-2470 .

Step114. The details like below. Save it.

Step115. Customer incoming payment document is created - 10001.

Step116. To see the customer open and cleared items after payment go to tcode- FBL5N.

Step117. Provide the customer number, company code and choose Cleared Items option and execute it.

Step118. The details appears in Green light as the customer open item is cleared with the payment

______________________________________________________________________________
Step0. Go to Transaction SPRO and click on SAP Reference Object.
Step1. Navigate along the highlighted path to create Company.
Step2. Click on New Entries.
Step3. Provide the details and save it. So the Company ABC is created.
Step4. Navigate along the highlighted path to create company code.
Step5. Click on Edit company code data.
Step6. Click on New Entries.
Step7. Provide company code details and click on save button
Step8. Provide additional details and click on Continue button
Step9. Company code AB99 is created. Save it and go back.
Step10. Navigate along the highlighted path to assign company code to company.
Step11. Find your company code entry.
Step12. Provide Company name for the company code and save it and go back
Step13. Navigate along the highlighted path to create fiscal year variant.
Step14. Click on New Entries.
Step15. Provide fiscal year variant name, number of posting period and no of special period and Save it. Select the Fiscal year variant and click on Periods options from left hand side.
Step16. Click on New Entries.
Step17. Provide the 12 period details and save it.
Step18. Go Back.
Step19. The variant with 12 posting periods are defined. Now Go Back.
Step20. We reached the initial screen. Now Go Back.
Step21. Navigate along the highlighted path.
Step22. Here we can find the line to assign the above created fiscal year variant to the Company code.
Step23. Assign the fiscal year variant to company code. Save it and go back.
Step24. Navigate along the highlighted path to create variants for open posting period.
Step25. Click on New Entries button.
Step26. Provide a 4 character variant name and description and save it. Go Back.
Step27. Navigate along the highlighted path to create open and close posting period.
Step28. Click on New Entries button.
Step29. Provide the below details. Save it and go Back.
Step30. Navigate along the highlighted path to assign Variant to company code.
Step31. The below line appears for the company code.
Step32. Assign the posting period variant to the company code. Save it & go back.
Step33. Navigate along the highlighted path to create our own document type or to see the details of teh standard document type provided by SAP.
Step34. The standard document type DR is provided for customer invoice. Double click on it to see the details.
Step35. We shall be using this document type DR to create customer invoice for our company code. To maintain number range for this document type click on the Number Range information button. Mark that we shall use number range '18'.
Step36. Here it asks for the company code name for which number range to be maintained for the document type DR.
Step37. Provide the company code and and click on the change button.
Step38. Click on the '+' button.
Step39. Provide number range '18', from number and To Number. Mention year as 9999 so that this number range can be used for our company code foe every year. If you want to maintain number range for a specific year then provide that year under the YEAR column. save it and go back to the main screen.
Step40. Standard Document type 'DZ' is provided to create document for the customer payment. Select the Document type DZ and click on the Details button.
Step41. To maintain the number range click on the Number Range Information Button.
Step42. The below screen appears.
Step43. Maintain our above created company code name and click on the Change button.
Step44. Click on the + button.
Step45. Maintain the below details like from and to number for the document type DZ. Save it and go back.
Step46. Navigate along the highlighted path to create tolerance group for the user.
Step47. Click on the New Entries Button.
Step48. Maintain the details and save it. Go Back.
Step49. Navigate along the highlighted path to assign the tolerance group to the user
Step50. Click on New Entries.
Step51.Provide the user name( 'sap logon user name') and the above created tolerance group. Save it and go Back.
Step52. Navigate along the highlighted path to create tolerance for customer.
Step53. Click on new entries button.
Step54. provide the below details. Save it and Go back.
Step55. Navigate along the highlighted path to create chart of account.
Step56. Click on New Entries button.
Step57. provide the chart of account name, G/L account length and save it.
Step58. Navigate along the highlighted path to assign the Chart of account to Company Code.
Step59. Go to our company code line.
Step60. provide the chart of account to the company code. Save it and go back.
Step61. Navigate along the highlighted path to create account group.
Step62. Click on New Entries.
Step63. Create three groups like customer, material and cash with from and to account range.
Here we just declared three groups as we will create customer invoice so that customer and material group are involved. When the customer makes the payment custometr and cash account are involved.
Step64. Navigate along the highlighted path to create Retained Earnings account.
Step65. Provide the above created chart of account number and click on the continue button.
Step66. provide below details and save it. Go back.
Step67. Navigate along the highlighted path to create field status variant.
Step68. Select the standard variant '0001' and click on the field status group.
Step69. Below Field Status Group are present in stanrdard. We shall be using these for our case.
Step70. Navigate along the highlighted path to assign the company code to the field status variant.
Step71. Go to our company code line.
Step72. Provide the details. Save it and Go Back.
Step73. Navigate along the highlighted path see the company code global parameters are maintained properly or not.
Step74. Select our company code and click on Details button.
Step75. Here you can find all the company code parameters assigned in different steps to the company code .
Step76. Now go to Tcode- FS00 to crate G/L account.
Step77. Click on the create button.
Step78.
In above we have created three groups each with different number range. Lets create Cash Account first. Provide a G/L account number, company code and click on continue button.
Step79. Provide the details and click on Control Tab.
Step80. Provide the details and click on the Create Bank/interest tab.
Step81. Select a field status group and save the CASH G/L account.
Step82. Again click on the Create button.
Step83. This time we shall be creating a material account.
Provide a material account number from the number range, provide company code and click on continue button.
Step84. provide the details. lastly click on Control Data tab.
Step85. Provide the details and click on the highlighted tab.
Step86. provide the field status group and save it.
Step87. Again click on create button to create a customer reconciliation account.
Step88. Provide the G/L account number, company code and click on the continue button.
Step89. provide the below details and click on Control Data tab.
Step90. Provide the below details and click on the next tab.
Step91. Provide the field status group and save it. Now the needed three accounts for our case are created.
Step92. Go to Tcode- XD01 to create a customer.
Step93. Select below details and click on the continue button
Step94. provide the details and then click on he company code Data button.
Step95. here we need to maintain the Reconciliation account for the customer. press F4 button.
Step96. Select the reconciliation account and continue.
Step97. Save the customer.
Step98. The below customer is crated.
Step99. To create customer invoice go to transaction : F-22.
Step100. The document type is DR , provide the company code
Step101. provide document date. As per the three golden rules of accounting, the customer is receiving the material so customer account is debited. So chose the posting key as 01 and the account is the customer name and hit the Enter key from keyboard.
Step102. Provide amount as 1000. The material account is credited. So choose posting key as 50 and provide the material account and hit the Enter key from keyboard.
Step103.
Step104. Povide material amount as 1000 and click on the document menu.
Step105. Click on simulate option
Step106. Here you can find two lines. Customer is debited and material G/L account is credited. At lats click on Save button.
Step107. Customer invoice type DR is created with document number: 1.
Step108. Go to tcode- FBL5N to see customer open and cleared items
Step109. Provide the customer number and the company code, choose Open Items radio button and execute it.
Step110. You can find the customer open items with the red traffic light.
Step111. Now the customer comes and make the payment. So in the sap system it should be captured. To clear the open items. So go to transaction F-28.
Step112. You can see the Document type is - DZ . Customer Incoming Payment.
Step113. Provide the document date, cash account -20000, amount-1000.
Customer number-2470 .
Step114. The details like below. Save it.
Step115. Customer incoming payment document is created - 10001.
Step116. To see the customer open and cleared items after payment go to tcode- FBL5N.
Step117. Provide the customer number, company code and choose Cleared Items option and execute it.
Step118. The details appears in Green light as the customer open item is cleared with the payment
______________________________________________________________________________
No comments:
Post a Comment