Scenario: SQL trace comparison with select statement with primary index and secondary index.
Step1. Go to SE11.

Step2. Provide the table name 'ZSTUDENT_DET' and click on crate button.

Step3. Provide the details, save and click on technical settings.

Step4. Provide the details, SAVE it and click on BACK button.

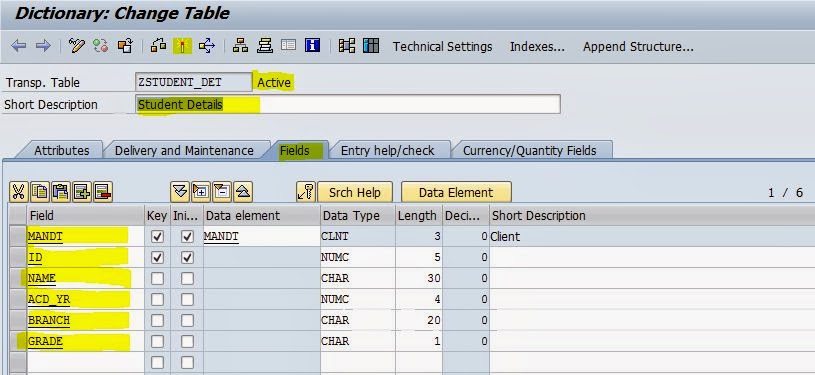
Step5. In the FIELDS tab, Provide some fields and activate the table as shown below:
Step6. Create a TMG for the table. Navigate along the highlighted path.

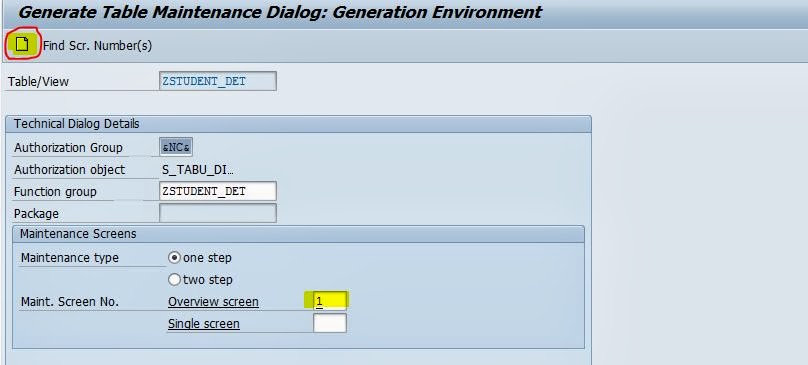
Step7. Provide the function group name same as the table name, choose One Step and clink on Find Scr. Number button.

Step8. Select the first radio button and click on continue.

Step9. Click on Create Button.
Step10. The TMG is created. Click on the back button.

Step11. Navigate along the highlighted path to create some records.

Step12. Click on the NEW ENTRIES button.

Step13. Create some records and click on save button.

Step14. The table Entries are shown below.

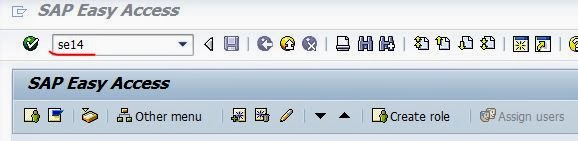
Step15. What are the Indexes created. Go to TCODE-SE14.

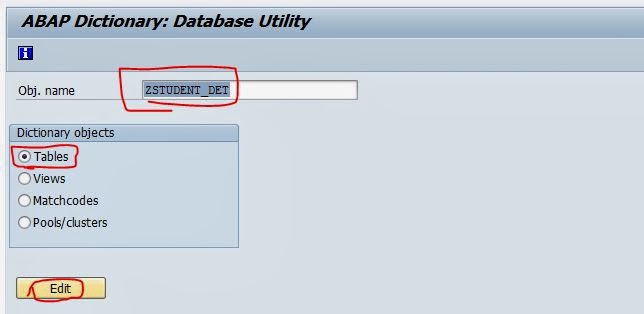
Step16. Provide the table name and click on EDIT button.
Step17. Click on the Indexes button as highlighted.

Step18. It shows the Primary Index and No secondary Index .At last click on the close button.

Step19. Click on the Check.. Button as highlighted.

Step20. Select First Radio button and click on Continue button.

Step21. It shows The Primary Index name and the fields that constitutes the Primary Index.

Step22. Let's go to SE38 to create a Report. Provide the Report name and click on the create button.

Step23. Enter the below text.

Step24. Go to TCODE- ST05 to trace the SQL statement.

Step25. Select the SQL Trace check box and click on the Activate Trace button.

Step26. Now the SQL trace is activated.

Step27. Run the above report and it shows all the records form the table.

Step28. Go to ST05 and click on The Deactivate Trace button.

Step29. Now click on the Display Trace button.

Step30. In the selection screen - Provide the name of the table 'ZSTUDENT_DET' in teh Object Name filed and click on the F8 button.

Step31. The below output is displayed. To FETCH the data (15 records) it takes 55 Millli Seconds.

Step32. Select the highlighted line with OPEN operation and click on the Explain button.

Step33. Go to Text Explain Tab and it shows the Input, Output with the Primary Index.

Step.34. Now go to the report and put a select-option field and write a select statement accordingly.

Step.35 Again go to ST05 and activate the trace.

Step.36 Run the report and provide some student IDs and click on F8 button.

Step.37 . click on the F8 button.

Step.38 The Report output is as shown below.

Step.39 Again go to ST05 and deactivate the trace and display the trace.

Step.40 In the selection screen provide the table name under the Object name and click on the F8 button.

Step.41 It displays the Output. It took around 38 milli second to fetch the 6 records from the table.

Step.42 . select the Line with OPEN operation and click on the Explain button.

Step.43. Goto Text Explain Tab and it displays the details.

Step.44. Now go to the report and create a parameter field and accordingly put a select statement.

Step.45 Activate the SQL trace in ST05.

Step.46 Provide a student Id and click on F8 button.

Step.47 . Below is the output.

Step.48. Go to ST05 and deactivate the trace and display the trace.

Step.49 . In the selection-screen provide the table name in the Object Name field and click on F8 button.

Step.50 . now to fetch a single record based on the primary key field it took 30 Milli Seconds.

Step.51 . Now select the line with operation OPEN and click on the Explain button.

Step.52 In the text Explain tab it shows the details.

Step.53. Now go to the report and create a select-option statement with non primary key field 'NAME' and write a select statement accordingly.

Step.54 . Run the report and provide some NAMEs in the selection screen and press F8.

Step.55 Go to ST05 and activate the Trace.

Step.56 > Now execute the report .

Step.57 . the output is displayed as shown below.

Step.58 Deactivate the trace in ST05 and click on the Display Trace button

Step.59 > in the selection-screen provide the table name in the Object Name field and press F8.

Step.60. Now it took around 96 milli seconds to FETCH the 6 records based on the non primary key. Select the line with OPEN operation and click on the Explain button.

Step.61. It displays the details.

Step.62. Now go to the table and click on the Index button to create a Secondary index.

Step.63 Click on the create button and select Create Index line.

Step.64. Provide a index name as S1 and then click on continue button.

Step.65. Select Unique Index and provide the field names to be a part of the primary index. Now SAVE it and Activate the same.

Step.66 . Now the secondary index is created.

Step.67. Go to SE14 transaction.
Step.68. Provide the table name 'ZSTUDENT_DET' and click on edit button.

Step.69. click on Indexed button.

Step.70. It shows the Indexes of the tabel.

Step.71. Click on the Check... Button.

Step.72. Select the first radio button and click on continue.

Step.73. It displays all the indexes of the table with field details.

Step.74. Now go to the same select-option for the NAME field and run it.

Step.75. Provide some names and click on F8 button.

Step.76 Go to ST05 Tcode and activate the SQl trace.

Step.77. Execute the report.

Step.78. It displays the output as shown below:

Step.80. go to ST05 and deactivate the trace and click on display trace button.

Step.81. Provide the table name in the Object Name field and click on F8.

Step.82 . Now it took 39 milli second to FETCH 6 records.

Step.83. Select the line with OPEN operation and click on Explain button.

Step.84. In the Text Explain tab, it displays all details.

Step.85. The whole Comparison:
The select * statement with no condition fetch 15 record in----------------------------------= 55 ms.
The select * statement with sel-opt primary key field condition fetch 6 rcd -------------------= 38 ms.
The select * statement with parameter primary key field condition fetch 1 rcd ----------------= 30 ms.
The select * stmt with sel-opt non primary key field (name)condition fetch 6 rcd without sec indx= 96 ms.
The select * stmt with sel-opt non primary key field (name)condition fetch 6 rcd with sec indx= 39 ms.

_______________________________________________________________________________
Step1. Go to SE11.
Step2. Provide the table name 'ZSTUDENT_DET' and click on crate button.
Step3. Provide the details, save and click on technical settings.
Step4. Provide the details, SAVE it and click on BACK button.
Step5. In the FIELDS tab, Provide some fields and activate the table as shown below:
Step6. Create a TMG for the table. Navigate along the highlighted path.
Step7. Provide the function group name same as the table name, choose One Step and clink on Find Scr. Number button.
Step8. Select the first radio button and click on continue.
Step9. Click on Create Button.
Step10. The TMG is created. Click on the back button.
Step11. Navigate along the highlighted path to create some records.
Step12. Click on the NEW ENTRIES button.
Step13. Create some records and click on save button.
Step14. The table Entries are shown below.
Step15. What are the Indexes created. Go to TCODE-SE14.
Step16. Provide the table name and click on EDIT button.
Step17. Click on the Indexes button as highlighted.
Step18. It shows the Primary Index and No secondary Index .At last click on the close button.
Step19. Click on the Check.. Button as highlighted.
Step20. Select First Radio button and click on Continue button.
Step21. It shows The Primary Index name and the fields that constitutes the Primary Index.
Step22. Let's go to SE38 to create a Report. Provide the Report name and click on the create button.
Step23. Enter the below text.
Step24. Go to TCODE- ST05 to trace the SQL statement.
Step25. Select the SQL Trace check box and click on the Activate Trace button.
Step26. Now the SQL trace is activated.
Step27. Run the above report and it shows all the records form the table.
Step28. Go to ST05 and click on The Deactivate Trace button.
Step29. Now click on the Display Trace button.
Step30. In the selection screen - Provide the name of the table 'ZSTUDENT_DET' in teh Object Name filed and click on the F8 button.
Step31. The below output is displayed. To FETCH the data (15 records) it takes 55 Millli Seconds.
Step32. Select the highlighted line with OPEN operation and click on the Explain button.
Step33. Go to Text Explain Tab and it shows the Input, Output with the Primary Index.
Step.34. Now go to the report and put a select-option field and write a select statement accordingly.
Step.35 Again go to ST05 and activate the trace.
Step.36 Run the report and provide some student IDs and click on F8 button.
Step.37 . click on the F8 button.
Step.38 The Report output is as shown below.
Step.39 Again go to ST05 and deactivate the trace and display the trace.
Step.40 In the selection screen provide the table name under the Object name and click on the F8 button.
Step.41 It displays the Output. It took around 38 milli second to fetch the 6 records from the table.
Step.42 . select the Line with OPEN operation and click on the Explain button.
Step.43. Goto Text Explain Tab and it displays the details.
Step.44. Now go to the report and create a parameter field and accordingly put a select statement.
Step.45 Activate the SQL trace in ST05.
Step.46 Provide a student Id and click on F8 button.
Step.47 . Below is the output.
Step.48. Go to ST05 and deactivate the trace and display the trace.
Step.49 . In the selection-screen provide the table name in the Object Name field and click on F8 button.
Step.50 . now to fetch a single record based on the primary key field it took 30 Milli Seconds.
Step.51 . Now select the line with operation OPEN and click on the Explain button.
Step.52 In the text Explain tab it shows the details.
Step.53. Now go to the report and create a select-option statement with non primary key field 'NAME' and write a select statement accordingly.
Step.54 . Run the report and provide some NAMEs in the selection screen and press F8.
Step.55 Go to ST05 and activate the Trace.
Step.56 > Now execute the report .
Step.57 . the output is displayed as shown below.
Step.58 Deactivate the trace in ST05 and click on the Display Trace button
Step.59 > in the selection-screen provide the table name in the Object Name field and press F8.
Step.60. Now it took around 96 milli seconds to FETCH the 6 records based on the non primary key. Select the line with OPEN operation and click on the Explain button.
Step.61. It displays the details.
Step.62. Now go to the table and click on the Index button to create a Secondary index.
Step.63 Click on the create button and select Create Index line.
Step.64. Provide a index name as S1 and then click on continue button.
Step.65. Select Unique Index and provide the field names to be a part of the primary index. Now SAVE it and Activate the same.
Step.66 . Now the secondary index is created.
Step.67. Go to SE14 transaction.
Step.68. Provide the table name 'ZSTUDENT_DET' and click on edit button.
Step.69. click on Indexed button.
Step.70. It shows the Indexes of the tabel.
Step.71. Click on the Check... Button.
Step.72. Select the first radio button and click on continue.
Step.73. It displays all the indexes of the table with field details.
Step.74. Now go to the same select-option for the NAME field and run it.
Step.75. Provide some names and click on F8 button.
Step.76 Go to ST05 Tcode and activate the SQl trace.
Step.77. Execute the report.
Step.78. It displays the output as shown below:
Step.80. go to ST05 and deactivate the trace and click on display trace button.
Step.81. Provide the table name in the Object Name field and click on F8.
Step.82 . Now it took 39 milli second to FETCH 6 records.
Step.83. Select the line with OPEN operation and click on Explain button.
Step.84. In the Text Explain tab, it displays all details.
Step.85. The whole Comparison:
The select * statement with no condition fetch 15 record in----------------------------------= 55 ms.
The select * statement with sel-opt primary key field condition fetch 6 rcd -------------------= 38 ms.
The select * statement with parameter primary key field condition fetch 1 rcd ----------------= 30 ms.
The select * stmt with sel-opt non primary key field (name)condition fetch 6 rcd without sec indx= 96 ms.
The select * stmt with sel-opt non primary key field (name)condition fetch 6 rcd with sec indx= 39 ms.
_______________________________________________________________________________
1 comment:
thank u very much
quite informative .............good work ...............
Post a Comment